While preparing for an author visit recently, I shared this image of my slide deck with a colleague. His reply closed with, “So colorful!” Vibrant colors and the unique nature of how felting techniques and colors create texture and shadows are both a challenge of the medium and a benefit.
This reaction to color was paired with remarks from the children who marveled at how fluffy a picture could be, or how cool it looked for a person to pop right out of the picture. Let’s explore ways your felting technique, color choices, and texture influence individual pieces and define your overall artistic style.

Felting Techniques and Color Choices
In the illustrations for my alphabet book, I have intentionally kept the color choices and felting techniques more on the bold side, with dense felting for a crisp, distinct overall style. In the few instances where I have left the wool fibers airy and light, they create a stark difference between the text on the pages and the illustration pictured on the opposite page.


Composition Orientation and Angles
The orientation of the composition also contributes to the overall style of the piece or body of work. I could keep the rainbow as a traditional full arch, or use an angled perspective as you see below. If the felted artwork is a standalone piece, the unique composition or angle must be worked out beforehand. Thumbnail sketches to nail down your composition are incredibly handy when you’re trying to achieve a really unique perspective or angled view of your subject. In my case, however, I have the ability to have fun with angles and camera position as I compose the photographed images for my book.


Texture Adds Detail
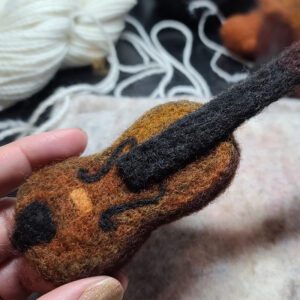
Wool fibers are not flat, and some are kinkier than others. I love felting with fibers that have a strong kink. I’m not sure if that is the technical term, but it works for me! Stick with me for the long haul and I’ll be sure to master all the technical terms of my craft. Not only do the individual fibers create beautiful pockets of light and shadow as they are felted together, but the layering of individual pieces of felted wool also creates beautiful texture. To build my nest I rolled individual felt twigs and then wove them together, just as a bird would do.
")
")

Combining 3D and 2D in Felt Artwork
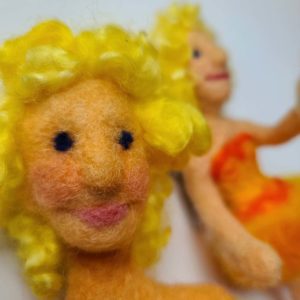
If you’ve been with me for a while, you know that this technique is the cornerstone of my style. I love the combination of a 2-dimensional wall painting with 3-dimensional elements that break the plane and have the artwork popping right out of the wall. In some cases, the 3D components are felted separately and then attached to the base illustration (like in the case of the bird’s nest), and other times the pop is more subtle and occurs when the fibers are built up directly on the base.
Master Tip: If you felt a 3D object on its own and then plan to attach it to the base, keeping the fibers loose in the area that will have the point of connection is very helpful. If the entire object is densely felted it is trickier to securely attach the object without distorting the shape in your effort to make a secure attachment. When there are loose fibers to attach to the base your connection is stronger and easier to felt.


Master Your Own Felting Style
As I experiment and learn new techniques with each felted illustration, I put together digital felting lessons to share with the world. I hope you’ll check them out and keep felting!

Free Felting Lessons
Learn techniques used to merge 2D and 3D felting into works of art that POP off the wall!